mysql事务隔离级别

断断续续研究mysql数据库的隔离级别,理解起来比较抽象,来回看了很多次才整理了如下总结。

先解释3个名词。

脏读:
如果事务1修改了数据,事务2读取了数据,但是由于某种原因回滚了事务1,事务2读到的数据就变为脏数据。
(简单理解为只要发生回滚动作的情况下产生的数据变化)

幻读:
比如事务1根据sql语句中的where条件获取了N条数据,事务1还未结束,事务2新增了符合where条件的X条数据,事务1再次执行sql就发现多出来一些数据。
(简单理解为符合条件索引多出来的数据变化)

不可重复读:
比如事务1获取了一条数据,事务2修改了这条数据,事务1再获取这条数据,发现变了。
(简单理解为没有发生回滚的情况下产生的数据变化)

PS:在不同的隔离级别下,出现上面的情况也不一样。

1、read uncommitted 读取未提交的数据
解释:两个事务,事务1写入了一条数据但是还未提交,事务2就可以读取到这条数据。
存在的问题:脏读、幻读、不可重复读

2、read committed 读取已提交的数据 (Oracle数据库的默认隔离级别)
解释:事务1未提交,事务2提交了新数据,事务1可以获取事务2提交的数据。可以解决脏读问题。
存在的问题:幻读、不可重复读

3、repeatable read 可重复读数据 (mysql的默认隔离级别)
解释:事务1在启动时给数据库”创建一个快照”,随后事务1在未提交之前所读取的数据都从这个快照中获取。即使其他事务修改了数据也不受影响。
不存在脏读、幻读、不可重复读(通过MVCC多版本并发控制解决不可重复读问题)

4、serializable 串行化:可以解决 脏读 不可重复读 和 虚读 -相当于锁表
没研究,不解释~

mysql死锁 Deadlock found when trying to get lock; try restarting transaction

研究了一下mysql的死锁,记录如下。
比如有2个事务,执行的sql分别如下:
这里用 #N 标识sql语句的执行顺序,下面开启两个mysql客户端连接,其中表的id为主键。

事务1
START TRANSACTION; #1
UPDATE username SET `name` = 't1' WHERE id = 1; #3
UPDATE username SET `name` = 't1' WHERE id = 2; #5
COMMIT;
事务2
START TRANSACTION; #2
UPDATE username SET `name` = 't2' WHERE id = 1; #6
UPDATE username SET `name` = 't2' WHERE id = 2; #4
COMMIT;

死锁:当出现2个(以上)事务互相等待对方释放锁的时候就会出现死锁。
PS:不管两个事务执行什么sql语句,只要出现互相等待对方释放就发生了死锁问题。

1、当执行#1 #2时两条事务开始
2、当执行#3 时,事务1将id=1的这条数据加锁(当sql语句执行时才加锁,事务开始时不会加)
3、当执行#4 时,事务2将id=2的这条数据加锁
4、当执行#5 时,事务1等待事务2释放锁(锁是在事务提交以后才释放)
此时,通过information_schema库INNODB_TRX事务表中查看正在运行的事务,注意2个事务中trx_weight的最小值,后续死锁时mysql可以确定需要回滚哪个事务。


5、当执行#6 时,事务2与事务1发生死锁。

mysql会报一个错误:Deadlock found when trying to get lock; try restarting transaction
通过mysql命令行执行:mysql> show engine innodb status\G; 查看mysql记录的信息(可以看到最后一次死锁)
------------------------
LATEST DETECTED DEADLOCK   # mysql检测到的最后一次死锁
------------------------
2019-03-13 11:52:13 0x7fd873618700
*** (1) TRANSACTION:  # 事务1
TRANSACTION 188912126, ACTIVE 32 sec starting index read
mysql tables in use 1, locked 1
LOCK WAIT 3 lock struct(s), heap size 1136, 2 row lock(s), undo log entries 1
MySQL thread id 1979385, OS thread handle 140567861790464, query id 328763106 192.168.1.1 root updating
UPDATE username SET `name` = 't1' WHERE id = 2 # 执行的sql
*** (1) WAITING FOR THIS LOCK TO BE GRANTED:
RECORD LOCKS space id 21691 page no 3 n bits 80 index PRIMARY of table `test_cjx`.`username` trx id 188912126 lock_mode X locks rec but not gap waiting
Record lock, heap no 9 PHYSICAL RECORD: n_fields 5; compact format; info bits 0
 0: len 4; hex 80000002; asc     ;;
 1: len 6; hex 00000b4291ff; asc    B  ;;
 2: len 7; hex 2b0000015101e7; asc +   Q  ;;
 3: len 2; hex 7432; asc t2;;
 4: len 4; hex 80000000; asc     ;;

*** (2) TRANSACTION:  # 事务2
TRANSACTION 188912127, ACTIVE 31 sec starting index read
mysql tables in use 1, locked 1
3 lock struct(s), heap size 1136, 2 row lock(s), undo log entries 1
MySQL thread id 1980464, OS thread handle 140567625434880, query id 328764925 192.168.1.1 root updating
UPDATE username SET `name` = 't2' WHERE id = 1 # 执行的sql
*** (2) HOLDS THE LOCK(S):
RECORD LOCKS space id 21691 page no 3 n bits 80 index PRIMARY of table `test_cjx`.`username` trx id 188912127 lock_mode X locks rec but not gap
Record lock, heap no 9 PHYSICAL RECORD: n_fields 5; compact format; info bits 0
 0: len 4; hex 80000002; asc     ;;
 1: len 6; hex 00000b4291ff; asc    B  ;;
 2: len 7; hex 2b0000015101e7; asc +   Q  ;;
 3: len 2; hex 7432; asc t2;;
 4: len 4; hex 80000000; asc     ;;

*** (2) WAITING FOR THIS LOCK TO BE GRANTED:
RECORD LOCKS space id 21691 page no 3 n bits 80 index PRIMARY of table `test_cjx`.`username` trx id 188912127 lock_mode X locks rec but not gap waiting
Record lock, heap no 8 PHYSICAL RECORD: n_fields 5; compact format; info bits 0
 0: len 4; hex 80000001; asc     ;;
 1: len 6; hex 00000b4291fe; asc    B  ;;
 2: len 7; hex 2a00000150025c; asc *   P \;;
 3: len 2; hex 7431; asc t1;;
 4: len 4; hex 80000000; asc     ;;

*** WE ROLL BACK TRANSACTION (2)  # mysql回滚了哪个事务
------------
TRANSACTIONS
------------

可以看到mysql回滚了事务2,此事务id为 188912127,此时事务1可以提交了,最终name的值应为t1。因为事务2的trx_weight权重最小(上面图显示了权重为3),所以回滚了(释放锁)。

linux下查找java占用cpu高的原因

目的:排查java程序占用cpu高的步骤。

1、首先使用top查到占用cpu最高的java进程 pid

可以看到占cpu最高的是pid为16156的进程,也是java的进程。通过ps查就是我启动的jar包。

2、查此进程的线程

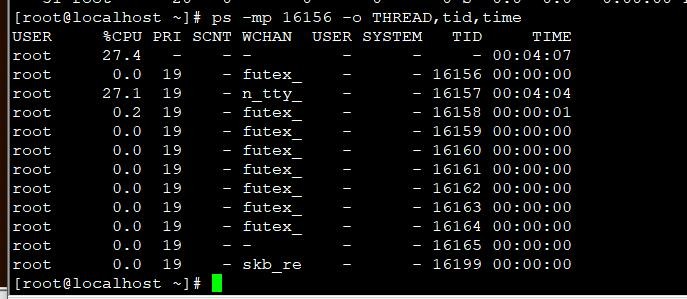
通过ps的 -m (显示线程) -p(pid进程使用的cpu时间)两个参数,配合自定义格式 -o 打印出来线程TID。

由上图可以看到线程16157占用cpu达27%,接下来查找此线程在做什么动作导致这么高。

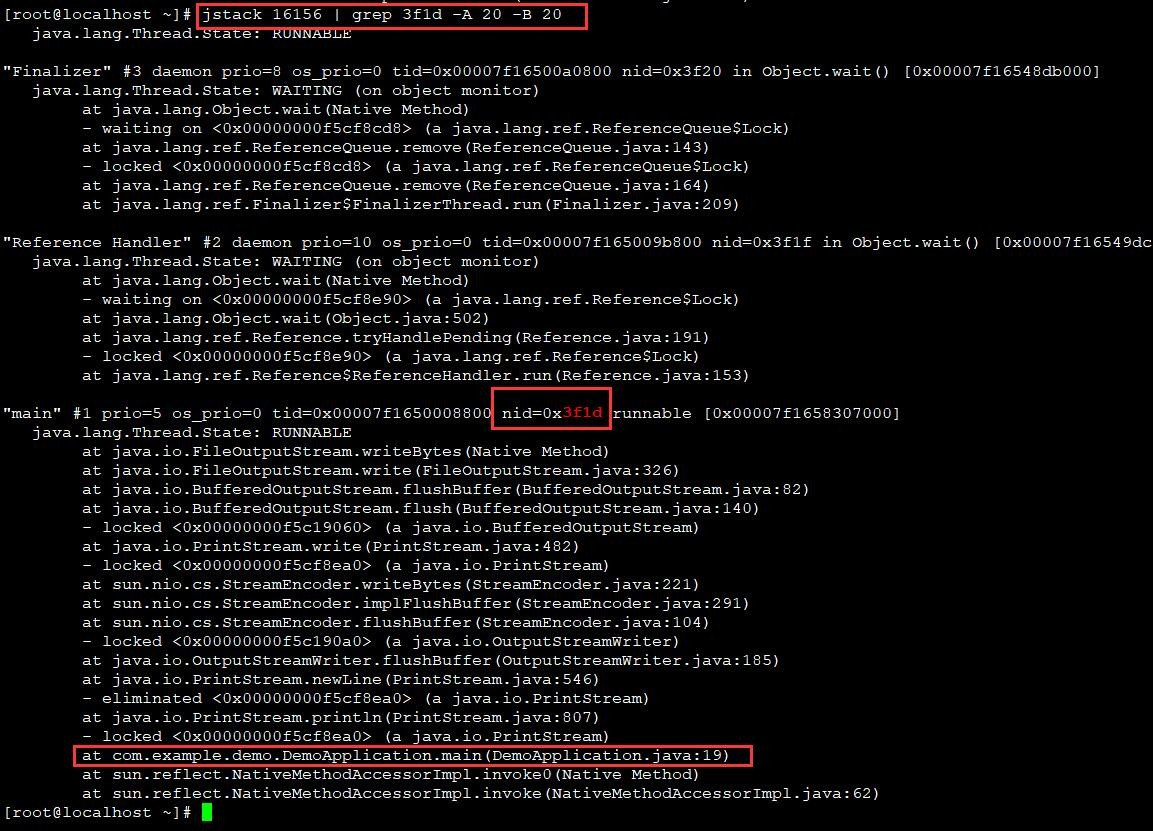
3、使用jdk自带的 jstack 工具根据进程pid查找并通过线程id(TID)的十六进制过滤堆栈跟踪信息

线程tid转十六进制:

[root@localhost ~]# printf "%x" 16157
3f1d[root@localhost ~]# 

16157的十六进制为3f1d

-A -B参数是打印过滤线程十六进制值的上下20行数据。

可以看到是DemoApplication.java中的19行代码导致的cpu占用高。

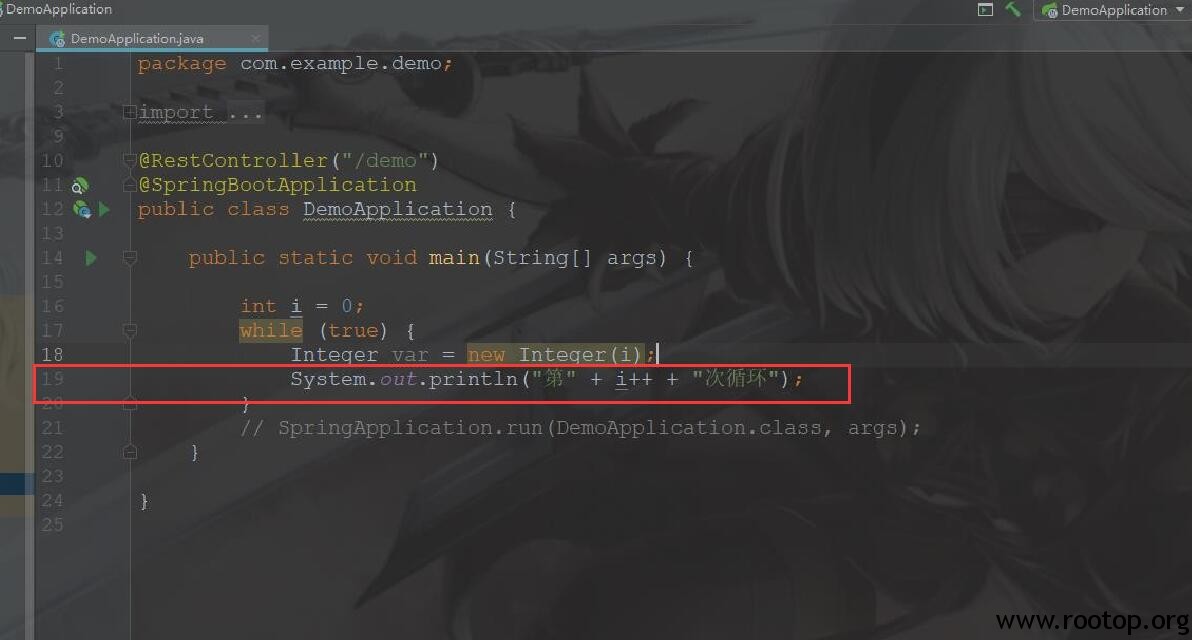
java代码:

这个地方循环打印数据导致的。记录此过程,便于以后排查问题。

解决spring cloud 中config配置中心经常需要重启的问题

问题现象:spring cloud项目,一定时间后更新某个微服务,启动时去config配置中心查找配置时报错。重启config可以解决,但是没找到具体原因。
后来发现/tmp目录下有tomcat.和config-repo开头的文件,推测是config生成的配置信息存在这里。tmp目录会被系统自动清理导致。
然后特意查了下资料解决。

关于tmp目录清理的资料来自:https://blog.51cto.com/kusorz/2051877
CentOS6以下系统(含)使用watchtmp + cron来实现定时清理临时文件的效果,这点在CentOS7发生了变化,在CentOS7下,系统使用systemd管理易变与临时文件,与之相关的系统服务有3个:

systemd-tmpfiles-setup.service  :Create Volatile Files and Directories
systemd-tmpfiles-setup-dev.service:Create static device nodes in /dev
systemd-tmpfiles-clean.service :Cleanup of Temporary Directories

# 相关的配置文件也有3个地方:

/etc/tmpfiles.d/*.conf
/run/tmpfiles.d/*.conf
/usr/lib/tmpfiles.d/*.conf

# 清理/tmp目录规则配置文件路径:

[root@node7 ~]# cat /usr/lib/tmpfiles.d/tmp.conf
#  This file is part of systemd.
#
#  systemd is free software; you can redistribute it and/or modify it
#  under the terms of the GNU Lesser General Public License as published by
#  the Free Software Foundation; either version 2.1 of the License, or
#  (at your option) any later version.

# See tmpfiles.d(5) for details

# Clear tmp directories separately, to make them easier to override
v /tmp 1777 root root 10d
v /var/tmp 1777 root root 30d

# Exclude namespace mountpoints created with PrivateTmp=yes
x /tmp/systemd-private-%b-*
X /tmp/systemd-private-%b-*/tmp
x /var/tmp/systemd-private-%b-*
X /var/tmp/systemd-private-%b-*/tmp

# 查看详细帮助文档执行下面命令

[root@node7 ~]# man tmpfiles.d
v
   Create a subvolume if the path does not exist yet and the file system supports this (btrfs). Otherwise create a
   normal directory, in the same way as d.
x
   Ignore a path during cleaning. Use this type to exclude paths from clean-up as controlled with the Age parameter.
   Note that lines of this type do not influence the effect of r or R lines. Lines of this type accept shell-style
   globs in place of normal path names.       
X
   Ignore a path during cleaning. Use this type to exclude paths from clean-up as controlled with the Age parameter.
   Unlike x, this parameter will not exclude the content if path is a directory, but only directory itself. Note that
   lines of this type do not influence the effect of r or R lines. Lines of this type accept shell-style globs in place
   of normal path names.   

通过帮助文档可以看到v参数用来创建一个不存在的目录,x参数用来忽略清理的文件or目录,X参数用来忽略目录,但目录下的文件还会被清理。
通过上面规则可见/tmp是10天清理一次,spring cloud的config服务运行后会在/tmp下生成tomcat.和config-repo开头的目录(我不确定命名是否为固定的还是开发人员可以自己修改),超过10天后就会被清理。
当其他服务模块启动时会去config服务查配置信息,但是目录被清理就会报错,此时重启config,再启动服务即可。

最终解决方法有2个,第一忽略清理/tmp/下指定开头的文件,第二修改jar包运行时的临时目录。
1、编辑/usr/lib/tmpfiles.d/tmp.conf 追加:

x /tmp/tomcat.*
x /tmp/config-repo*

2、采用修改jar包运行时-Djava.io.tmpdir参数实现(我所采用的方法):

java -jar -Djava.io.tmpdir=./tmp # 在当前jar包目录下手动创建一个tmp目录,用于保存config配置信息。

问题才解决。

通过mutate插件对原日志进行分割

需求:通过filter中mutate插件实现将原java日志分割,取出日志等级字段。
当判断为ERROR级别后提交到指定url进行下一步处理。

input {
    file {
        type => "api"
        path => "/home/jar/api/logs/*-error.log"
        codec => multiline {
            pattern => "^[0-9]{4}-[0-9]{2}-[0-9]{2} [0-9]{2}:[0-9]{2}:[0-9]{2}.[0-9]{3}"
            negate => true
            what => previous
        }
    }
}

filter {
        mutate {
                copy => {
                        "message" => "source_message"
                }
        }
}

filter {
        mutate {
                split => ["message", " "]
                add_field => {
                        "level" => "%{[message][2]}"
                }
        }
}

output {
 
    if [level] == "ERROR" {
        http {
            http_method => "post"
            url => "http://xxx/logstash.php"
        }
    }
 
    stdout {
        codec => rubydebug
    }
 
}

关键配置注解:

如一条日志为:2019-02-20 15:55:47.273 ERROR [http-nio-8081-exec-32] io.renren.service.impl.CertificateServiceImpl.notify:840 – 支付宝回调返回不成功

# 保留原日志 (后来发现这种方式是错误的,原日志中的空格会被逗号代替,影响了原格式)
add_field => {
“source_message” => “%{message}”
}
需要换成下面配置
filter {
mutate {
copy => {
“message” => “source_message”
}
}
}
这样才能保留原先格式。

# 添加字段level,值为原日志第3个字段(分割后的第2个字段)
add_field => {
“level” => “%{[message][2]}”
}