Rootop 服务器运维与web架构

2024-08-08
发表者 Venus
mysqldump只备份函数已关闭评论

mysqldump只备份函数

# 只导出表结构 --no-data
C:\Users\admin\Desktop>"c:\Program Files\mysql\MySQL Server 8.0\bin\mysqldump.exe" -uroot -proot test_db1 --no-data > test_db1.sql

# 只导出数据,不带表结构 --no-create-info
C:\Users\admin\Desktop>"c:\Program Files\mysql\MySQL Server 8.0\bin\mysqldump.exe" -uroot -proot test_db1 --no-create-info > test_db1.sql

# 只导出存储过程和自定义函数
C:\Users\admin\Desktop>"c:\Program Files\mysql\MySQL Server 8.0\bin\mysqldump.exe" -uroot -proot test_db1 --no-data --no-create-info --routines > test_db1.sql

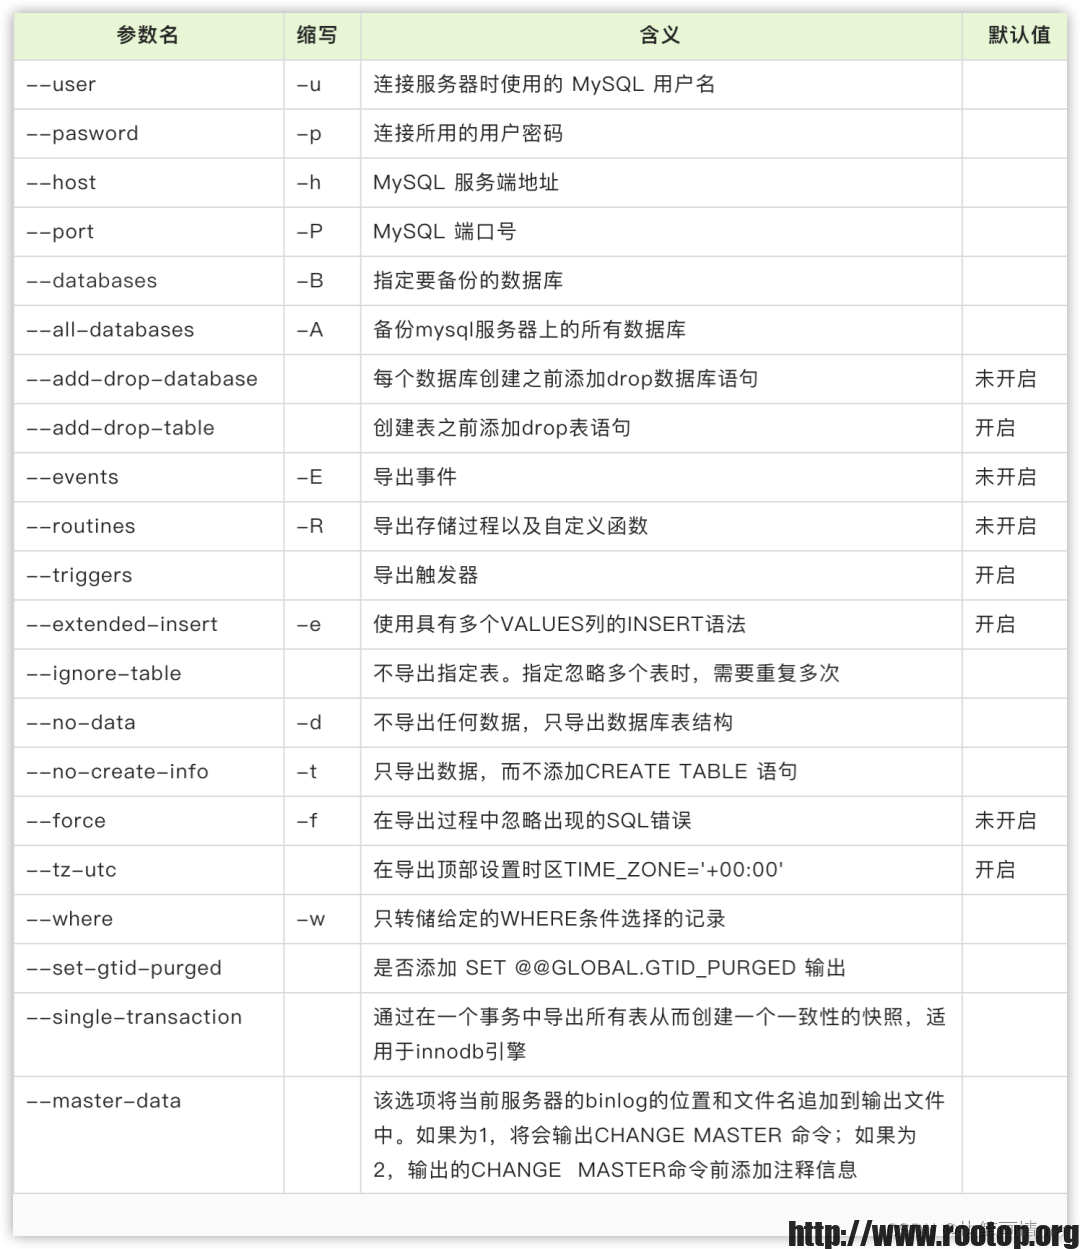
mysqldump备份参数参考

2024-07-25
发表者 Venus
ubuntu中扫描硬盘坏块已关闭评论

ubuntu中扫描硬盘坏块

作者: “Zhwt”,一位极其爱折腾的小哥。

今天收到粉丝投稿  – ↑ –

使用 badblocks 命令扫描磁盘上的坏块.

# badblocks -b 4096 -o badblocks.txt -nsv /dev/sda
  • -b 4096: 指定扫描的块大小, 可以用 tune2fs -l partition | grep 'Block size' 查看某个分区的信息
  • -o badblocks.txt 坏块信息输出到 badblocks.txt 而不是 stdout
  • -n 指定用非破坏性读写测试. 在测试之前自动备份扇区的原始内容, 然后写入随机数据并读取, 最后从备份中恢复原始内容. 适合硬盘上已经有数据的情况, 这种方式不会破坏硬盘上原有的数据
  • -s 显示进度
  • -v 显示详细信息, 显示坏块信息到 stdout

需要注意的是在使用 badblocks 检查坏块时, 被检查的磁盘不能处于被挂载的状态, 如果提示:

/dev/sda is mounted; it's not safe to run badblocks!

说明需要先 umount 解除磁盘的挂载, 然后再运行 badblocks 扫描. 建议可以用 Clonezilla 或者 Ubuntu 系统安装盘起一个 live 环境然后扫描.

示例输出:

# badblocks -b 4096 -o badblocks.txt -nsv /dev/sda
Checking for bad blocks in non-destructive read-write mode
From block 0 to 3909653
Checking for bad blocks (non-destructive read-write test)
Testing with random pattern:  11.45% done, 1:41 elapsed. (1/2/3 errors)

最后的 (1/2/3 errors) 指的是 1 个读取错误, 2 个写入错误, 3 个 corruption error(损坏错误, 不会翻译)

利用已知坏块信息重新创建分区:

# mke2fs -t filesystem-type -l badblocks.txt /dev/sda2

查看 SMART 信息

列出挂载的磁盘信息:

# lsblk
NAME   MAJ:MIN RM  SIZE RO TYPE MOUNTPOINTS
sda      8:0    0 14.9G  0 disk
├─sda1   8:1    0  711M  0 part /boot/efi
└─sda2   8:2    0 14.2G  0 part /

查看硬盘 SMART 信息:

smartctl -a /dev/sda

如果这一步提示找不到命令, 需要安装 smartmoontools 包:

apt install smartmontools

示例 SMART 信息:

# smartctl -a /dev/sda
smartctl 7.4 2023-08-01 r5530 [x86_64-linux-6.8.0-39-generic] (local build)
Copyright (C) 2002-23, Bruce Allen, Christian Franke, www.smartmontools.org

=== START OF INFORMATION SECTION ===
Device Model:     FORESEE 16GB SSD
Serial Number:    I48883J003721
LU WWN Device Id: 5 02b2a2 01d1c1b1a
Add. Product Id:  mavlsata
Firmware Version: V3.24
User Capacity:    16,013,942,784 bytes [16.0 GB]
Sector Size:      512 bytes logical/physical
Rotation Rate:    Solid State Device
TRIM Command:     Available
Device is:        Not in smartctl database 7.3/5528
ATA Version is:   ACS-3 T13/2161-D revision 4
SATA Version is:  SATA 3.2, 6.0 Gb/s (current: 6.0 Gb/s)
Local Time is:    Thu Jul 25 07:01:14 2024 UTC
SMART support is: Available - device has SMART capability.
SMART support is: Enabled

=== START OF READ SMART DATA SECTION ===
SMART overall-health self-assessment test result: PASSED

General SMART Values:
Offline data collection status:  (0x02) Offline data collection activity
                                        was completed without error.
                                        Auto Offline Data Collection: Disabled.
Self-test execution status:      (   0) The previous self-test routine completed
                                        without error or no self-test has ever
                                        been run.
Total time to complete Offline
data collection:                (    0) seconds.
Offline data collection
capabilities:                    (0x35) SMART execute Offline immediate.
                                        No Auto Offline data collection support.
                                        Abort Offline collection upon new
                                        command.
                                        No Offline surface scan supported.
                                        Self-test supported.
                                        Conveyance Self-test supported.
                                        No Selective Self-test supported.
SMART capabilities:            (0x0002) Does not save SMART data before
                                        entering power-saving mode.
                                        Supports SMART auto save timer.
Error logging capability:        (0x00) Error logging NOT supported.
                                        General Purpose Logging supported.
Short self-test routine
recommended polling time:        (   1) minutes.
Extended self-test routine
recommended polling time:        (   1) minutes.
Conveyance self-test routine
recommended polling time:        (   1) minutes.

SMART Attributes Data Structure revision number: 5
Vendor Specific SMART Attributes with Thresholds:
ID# ATTRIBUTE_NAME          FLAG     VALUE WORST THRESH TYPE      UPDATED  WHEN_FAILED RAW_VALUE
  5 Reallocated_Sector_Ct   0x0033   100   100   010    Pre-fail  Always       -       0
  9 Power_On_Hours          0x0033   100   100   010    Pre-fail  Always       -       4559
 12 Power_Cycle_Count       0x0033   100   100   010    Pre-fail  Always       -       1107
161 Unknown_Attribute       0x0033   100   100   010    Pre-fail  Always       -       0
164 Unknown_Attribute       0x0033   100   100   010    Pre-fail  Always       -       42474
165 Unknown_Attribute       0x0033   100   100   010    Pre-fail  Always       -       51
166 Unknown_Attribute       0x0033   100   100   010    Pre-fail  Always       -       17
167 Unknown_Attribute       0x0033   100   100   010    Pre-fail  Always       -       40
169 Unknown_Attribute       0x0033   100   100   010    Pre-fail  Always       -       0
176 Erase_Fail_Count_Chip   0x0033   100   100   010    Pre-fail  Always       -       0
177 Wear_Leveling_Count     0x0033   100   100   010    Pre-fail  Always       -       0
178 Used_Rsvd_Blk_Cnt_Chip  0x0033   100   100   010    Pre-fail  Always       -       0
192 Power-Off_Retract_Count 0x0033   100   100   010    Pre-fail  Always       -       14
194 Temperature_Celsius     0x0033   100   100   010    Pre-fail  Always       -       48
195 Hardware_ECC_Recovered  0x0033   100   100   010    Pre-fail  Always       -       0
199 UDMA_CRC_Error_Count    0x0033   100   100   010    Pre-fail  Always       -       0
241 Total_LBAs_Written      0x0033   100   100   010    Pre-fail  Always       -       237
242 Total_LBAs_Read         0x0033   100   100   010    Pre-fail  Always       -       659
243 Unknown_Attribute       0x0033   100   100   010    Pre-fail  Always       -       0
244 Unknown_Attribute       0x0033   100   100   010    Pre-fail  Always       -       0
245 Unknown_Attribute       0x0033   100   100   010    Pre-fail  Always       -       0
246 Unknown_Attribute       0x0033   100   100   010    Pre-fail  Always       -       0
250 Read_Error_Retry_Rate   0x0033   100   100   010    Pre-fail  Always       -       0
251 Unknown_Attribute       0x0033   100   100   010    Pre-fail  Always       -       0
252 Unknown_Attribute       0x0033   100   100   010    Pre-fail  Always       -       0
253 Unknown_Attribute       0x0033   100   100   010    Pre-fail  Always       -       0
254 Unknown_SSD_Attribute   0x0033   100   100   010    Pre-fail  Always       -       0

SMART Error Log not supported

SMART Self-test Log not supported

Selective Self-tests/Logging not supported

The above only provides legacy SMART information - try 'smartctl -x' for more

如果提示信息如下说明硬盘不支持 SMART, 例如在 VMWare 虚拟机里的虚拟磁盘:

# smartctl -a /dev/sda
smartctl 7.2 2020-12-30 r5155 [x86_64-linux-5.15.0-113-generic] (local build)
Copyright (C) 2002-20, Bruce Allen, Christian Franke, www.smartmontools.org

=== START OF INFORMATION SECTION ===
Vendor:               VMware,
Product:              VMware Virtual S
Revision:             1.0
User Capacity:        107,374,182,400 bytes [107 GB]
Logical block size:   512 bytes
Rotation Rate:        Solid State Device
Device type:          disk
Local Time is:        Thu Jul 25 15:04:32 2024 CST
SMART support is:     Unavailable - device lacks SMART capability.

=== START OF READ SMART DATA SECTION ===
Current Drive Temperature:     0 C
Drive Trip Temperature:        0 C

Error Counter logging not supported

Device does not support Self Test logging

需要注意 SMART 信息中的 Reallocated_Sector_Ct, Reallocated_Event_Count, Current_Pending_Sector 这三条数据, 如果开始升高说明可能磁盘上出现坏块而且数量在增加

参考:

  1. https://wiki.archlinux.org/title/Badblocks
  2. https://www.baeldung.com/linux/disk-check-repair-bad-sectors
  3. https://forum.openmediavault.org/index.php?thread/21047-clip-out-bad-sectors/
2024-07-16
发表者 Venus
XHR和fetch两种类型对OPTIONS方法和预检请求区别整理已关闭评论

XHR和fetch两种类型对OPTIONS方法和预检请求区别整理

XHR是传统的数据请求方式,而 Fetch API 则代表了现代Web开发的新兴标准。

fetch和XMLHttpRequest(XHR)在处理跨域请求时的行为有所不同。

# fetch
fetch默认不发送OPTIONS请求。
如果需要发送OPTIONS请求,需要显式地创建一个OPTIONS请求并使用fetch发送。

# XMLHttpRequest (XHR)
XHR在跨域请求时浏览器会先发送OPTIONS请求,以检查服务器是否允许实际请求跨域访问资源。
这是浏览器的一种安全措施,确保服务器知道请求的方法、来源和头部是安全的。

预检请求(Preflight Request):在实际的跨域请求之前,浏览器会首先发送一个 OPTIONS 请求,以检测服务器是否支持真实的跨域请求。
这个 OPTIONS 请求中会携带以下请求头信息:
Access-Control-Request-Headers:告知服务器实际请求可能携带的自定义请求头字段。
Access-Control-Request-Method:告知服务器实际请求所使用的 HTTP 方法。

服务端响应:
服务端需要设置响应头,以允许跨域请求。以下是一些关键的响应头字段
Access-Control-Allow-Methods: 返回服务端允许的请求方法,包括 GET、HEAD、PUT、PATCH、POST、DELETE 等。
Access-Control-Allow-Credentials:允许跨域携带 cookie(如果跨域请求需要携带 cookie,这个字段必须设置为 true)。
Access-Control-Allow-Origin: 允许跨域请求的域名,可以在服务端配置信任的域名白名单。
Access-Control-Allow-Headers: 允许跨域携带自定义请求头。

参考:https://www.cnblogs.com/magicg/p/13670213.html

########################################################################################

在配置 aws cloudfront 时要注意两种 “缓存键和源请求” 的区别!!!

这两个标头,需要被 CloudFront 正确的转发至 S3,才能使有 OPTIONS 的跨域成功被满足。然而恰巧两种「缓存键和源请求」对于处理这个标头的方式不同:

1. 使用 Cache policy and origin request policy (recommended),缓存策略是 CachingOptimized、源请求策略 无。
这样的配置会让 CloudFront 过滤掉以上两个 Access-Control-* 标头。
参考基准:当使用 Cache policy and origin request policy,需参考文档 [1] 的表格,确认您需要转发的标头是否在表格中、且是否默认会被转发。
然而 Access-Control-* 属于表格中第一列「其他定义的标头」,行为会是:被过滤。

解决方式:使用「源请求策略」功能,选择「CORS-S3Origin」,配置完成后刷新缓存(失效)。

2. 使用 Legacy cache settings,也就是「旧缓存设置」,旧缓存设置的行为,如同表格 [1] 第一列「其他定义的标头」提到的,「旧缓存设置 会使 CloudFront 将标头转发到源」,因此您使用旧缓存设置的时候,不用额外多做配置就可以将 Access-Control-* 转发到源,使 OPTIONS 成功。

因此建议您当使用 Cache policy and origin request policy 时需要额外注意标头是否被转发,并使用「源请求策略」来放行特定标头,以 CORS 跨域来说选择「CORS-S3Origin」并清理下缓存即可让 OPTIONS 成功。
或者是直接使用「旧缓存设置」也可以达成您的需求。

文档1:https://docs.aws.amazon.com/zh_cn/AmazonCloudFront/latest/DeveloperGuide/RequestAndResponseBehaviorCustomOrigin.html#request-custom-headers-behavior

2024-07-12
发表者 Venus
nginx配置br压缩已关闭评论

nginx配置br压缩

# br模块仓库 https://github.com/google/ngx_brotli

注意br模块只能在https中用。http协议是不支持的。

当浏览器发送请求时,会在请求头中携带支持的压缩算法。
比如chrome访问http网站时,请求头中为Accept-Encoding: gzip, deflate
访问https网站时,请求头中为Accept-Encoding: gzip, deflate, br, zstd

nginx可以同时配置gzip和br压缩算法,如果浏览器的请求头中含有br,则优先于gzip。

# 错误:CMake 3.15 or higher is required. You are running version 3.6.0
# 安装新版本cmake,否则可能会提示上面CMake版本过低问题。

[root@web02 ~]# cd /usr/local/
[root@web02 local]# wget -c https://cmake.org/files/v3.30/cmake-3.30.0-linux-x86_64.tar.gz
[root@web02 local]# tar zxvf cmake-3.30.0-linux-x86_64.tar.gz 

[root@web02 local]# echo 'export PATH=$PATH:/usr/local/cmake-3.30.0-linux-x86_64/bin' >> /etc/profile
[root@web02 ~]# source /etc/profile

# 构建依赖
[root@web02 ~]# cat br
git clone --recurse-submodules https://github.com/google/ngx_brotli
cd ngx_brotli/deps/brotli
mkdir out && cd out
cmake -DCMAKE_BUILD_TYPE=Release -DBUILD_SHARED_LIBS=OFF -DCMAKE_C_FLAGS="-Ofast -m64 -march=native -mtune=native -flto -funroll-loops -ffunction-sections -fdata-sections -Wl,--gc-sections" -DCMAKE_CXX_FLAGS="-Ofast -m64 -march=native -mtune=native -flto -funroll-loops -ffunction-sections -fdata-sections -Wl,--gc-sections" -DCMAKE_INSTALL_PREFIX=./installed ..
cmake --build . --config Release --target brotlienc

[root@web02 ~]# bash br

# nginx添加br的编译参数
./configure --add-module=../ngx_brotli


# nginx虚拟主机配置
server
{

	listen       16666 ssl;
	http2 on;
	server_name  localhost;

	ssl_certificate /home/software/openresty/nginx/conf/vhost/fullchain5.pem;
	ssl_certificate_key /home/software/openresty/nginx/conf/vhost/privkey5.pem;
	
	ssl_session_timeout 5m;
	ssl_protocols TLSv1.1 TLSv1.2 TLSv1.3;
	ssl_ciphers ECDHE-RSA-AES128-GCM-SHA256:HIGH:!aNULL:!MD5:!RC4:!DHE;
	ssl_prefer_server_ciphers on;


	index index.html;
	root /home/software/openresty/nginx/html;

	#启用brotli压缩
	brotli on;
	brotli_comp_level 6;
	brotli_buffers 16 8k;
	brotli_min_length 20;
	# 注意要配置压缩的文件类型(content-type)
	brotli_types text/plain text/css application/json application/x-javascript text/xml application/xml application/xml+rss text/javascript application/javascript image/svg+xml application/wasm application/octet-stream;  


	# 反向代理用法
	#location /
	#{
		#proxy_pass http://192.168.12.196:8888;
		#proxy_set_header Accept-Encoding "";

		#启用brotli压缩
		#brotli on;
		#brotli_comp_level 6;
		#brotli_buffers 16 8k;
		#brotli_min_length 20;
		# 注意要配置压缩的文件类型(content-type)
		#brotli_types text/plain text/css application/json application/x-javascript text/xml application/xml application/xml+rss text/javascript application/javascript image/svg+xml application/wasm application/octet-stream;  
	#}
}

2024-06-27
发表者 Venus
sshfs远程挂载到本地已关闭评论

sshfs远程挂载到本地

sshfs命令可以将远程文件系统挂载到本地文件系统,使得远程文件可以像本地文件一样访问。

[root@web ~]# yum install -y fuse-sshfs
# ubuntu安装:apt install sshfs

# 将远程主机的/mnt目录挂载到本地的/mnt目录
[root@web ~]# sshfs root@192.168.12.220:/mnt /mnt
提示输入密码

[root@web ~]# df -h| grep mnt
root@192.168.12.220:/mnt   49G  2.1G   47G   5% /mnt

# 卸载
[root@web ~]# fusermount -u /mnt/