构建任务中的时间不对,需要对其调整为中国时区。
系统已经设置为asia/shanghai
jenkins中也配置一下。
依次找到 jenkin – 系统管理 – 脚本命令行
输入并执行:
System.setProperty('org.apache.commons.jelly.tags.fmt.timeZone', 'Asia/Shanghai')

2024-01-05
发表者 Venus
jenkins时区已关闭评论
构建任务中的时间不对,需要对其调整为中国时区。
系统已经设置为asia/shanghai
jenkins中也配置一下。
依次找到 jenkin – 系统管理 – 脚本命令行
输入并执行:
System.setProperty('org.apache.commons.jelly.tags.fmt.timeZone', 'Asia/Shanghai')
2024-01-02
发表者 Venus
配置不同用户主动访问外网的源ip已关闭评论
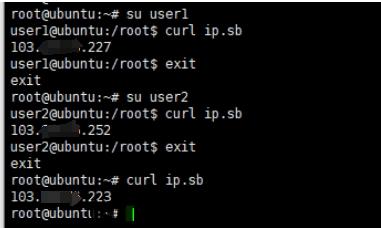
程序需要从对方接口获取大量数据,但是对方有ip访问速率限制,所以需要启动多个进程去拉取数据,同时将不同进程访问外网的源ip设置为不同地址。
服务器上有3个ip,需要分别从3个ip去主动访问接口。
这里通过iptables中的mangle表,对不同的用户数据包打标记的功能实现。
首先添加2个用户,user1、user2,通过/etc/passwd查看用户的uid。
用户  - uid
user1 - 10002
user2 - 10003
# 对 user1 的包打1002的标记,和uid一致即可。方便区分。
iptables -t mangle -A OUTPUT -m owner --uid-owner 1002 -j MARK --set-mark 1002
iptables -t nat -A POSTROUTING -m mark --mark 1002 -j SNAT --to-source 103.x.x.227

# 对 user2 的包打10003的标记
iptables -t mangle -A OUTPUT -m owner --uid-owner 1003 -j MARK --set-mark 1003
iptables -t nat -A POSTROUTING -m mark --mark 1003 -j SNAT --to-source 103.x.x.252
这样当用不同的账号去运行程序,源ip就会不同。
2023-12-25
发表者 Venus
yum安装的php-fpm通过多pool实现每个项目独立错误日志和慢日志已关闭评论
通过多个pool方式独立
[root@localhost etc]# cat php-fpm.conf |grep -vE "^;|^$"
include=/etc/php-fpm.d/*.conf
[global]
pid = /run/php-fpm/php-fpm.pid
error_log = /var/log/php-fpm/error.log
daemonize = yes
[root@localhost log]# cd /etc/php-fpm.d/
[root@localhost php-fpm.d]# ll
total 8
-rw-r--r-- 1 root root 705 Dec 22 03:27 www1.conf
-rw-r--r-- 1 root root 705 Dec 22 03:27 www2.conf
[root@localhost php-fpm.d]# cat *
[www1]
user = www-data
group = www-data
listen = 127.0.0.1:9000
pm = dynamic
pm.max_children = 200
pm.start_servers = 10
pm.min_spare_servers = 10
pm.max_spare_servers = 20
pm.max_requests = 5000
pm.status_path = /php-status
ping.path = /php-ping
ping.response = pong
access.log = /dev/null
slowlog = /data/www/test/log/$pool-slow.log
request_slowlog_timeout = 1
rlimit_files = 102400
php_admin_value[error_log] = /data/www/test/log/$pool-error.log
php_admin_flag[log_errors] = on
php_admin_flag[display_errors] = off
php_admin_value[post_max_size] = 50M
php_admin_value[upload_max_filesize] = 50M
php_admin_value[session.save_handler] = files
php_admin_value[session.save_path] = /data/www/test/session

[www2]
user = www-data
group = www-data
listen = 127.0.0.1:9001
pm = dynamic
pm.max_children = 200
pm.start_servers = 10
pm.min_spare_servers = 10
pm.max_spare_servers = 20
pm.max_requests = 5000
pm.status_path = /php-status
ping.path = /php-ping
ping.response = pong
access.log = /dev/null
slowlog = /data/www/test/log/$pool-slow.log
request_slowlog_timeout = 1
rlimit_files = 102400
php_admin_value[error_log] = /data/www/test/log/$pool-error.log
php_admin_flag[log_errors] = on
php_admin_flag[display_errors] = off
php_admin_value[post_max_size] = 50M
php_admin_value[upload_max_filesize] = 50M
php_admin_value[session.save_handler] = files
php_admin_value[session.save_path] = /data/www/test/session
2023-12-25
发表者 Venus
php配置参数生效范围已关闭评论
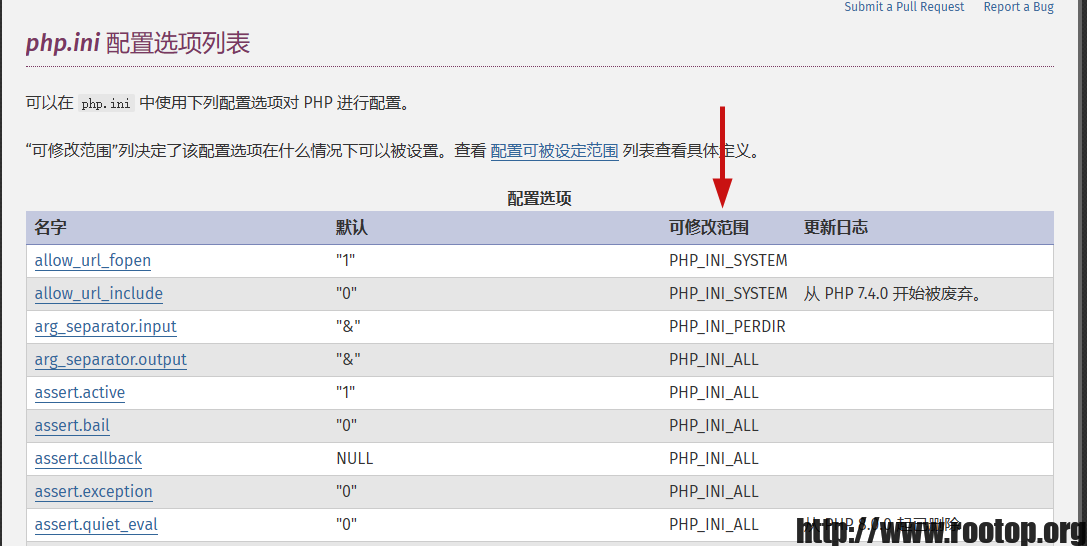
php.ini 配置选项列表
https://www.php.net/manual/zh/ini.list.php
列表中有一列为 “可修改范围”,这个范围就是指可以在
1、php.ini中配置
2、代码中通过ini_set()配置
3、httpd.conf 或 .htaccess
4、.user.ini
这些配置中进行修改。
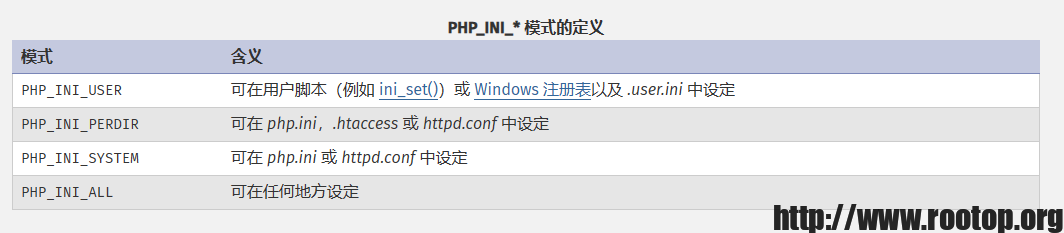
范围参考:https://www.php.net/manual/zh/configuration.changes.modes.php
# 为每个项目单独创建一个 .user.ini ,然后单独配置错误日志路径
# .user.ini作用
在PHP_INI_USER的配置项中,提到.user.ini。
这里作用解释如下:
除了主 php.ini 之外,PHP 还会在每个目录下扫描 INI 文件,从被执行的 PHP 文件所在目录开始一直上升到 web 根目录($_SERVER['DOCUMENT_ROOT'] 所指定的)。
如果被执行的 PHP 文件在 web 根目录之外,则只扫描该目录。
.user.ini 是PHP 支持基于每个目录的 INI 文件配置。如果你的 PHP 以模块化运行在 Apache 里,则用 .htaccess 文件有同样效果。
这里就很清楚了,.user.ini 实际上就是一个可以由用户 "自定义"的php.ini,我们能够自定义的设置是模式为"PHP_INI_PERDIR 、 PHP_INI_USER"的设置。(上面表格中没有提到的PHP_INI_PERDIR也可以在.user.ini中设置)
而且,和php.ini不同的是,.user.ini是一个能被动态加载的ini文件。也就是说我修改了.user.ini后,不需要重启服务器中间件,只需要等待user_ini.cache_ttl所设置的时间(默认为300秒),即可被重新加载。
这里的意思就是说我们在.user.ini中设置php.ini中PHP_INI_PERDIR 和 PHP_INI_USER 模式的 INI 设置,只要是使用CGI/FastCGI模式的服务器都可以使用.user.in
原文链接:https://blog.csdn.net/weixin_53146913/article/details/124840296
# 注意注释掉 pool 配置文件中下面2行,否则 .user.ini 中的会失效。
cat /etc/php-fpm.d/www.conf| grep error

;php_admin_value[error_log] = /var/log/php-fpm/www-error.log
;php_admin_flag[log_errors] = on
# 自定义ini文件
cat /data/html/web1/.user.ini

error_log = /var/log/php-fpm/web1-error.log
log_errors = on
display_errors = off
例如 error_log 的”可修改范围”值为 PHP_INI_ALL ,所以可以通过 .user.ini 实现为项目单独一个错误日志。
![]()
# 在www.conf中会有一个关于慢日志的配置,这个无法通过.user.ini独立,因为它属于php-fpm配置,需要多个pool。
slowlog = /var/log/php-fpm/www-slow.log
request_slowlog_timeout = 3
如果想把php的慢日志也独立,需要多个pool来区分。
# 通过php-fpm中的配置修改php.ini配置
php_value/php_flag
php_admin_value/php_admin_flag
# 下面2个配置会被ini_set覆盖
php_value name value
设置指定的值. 只适合于 PHP_INI_ALL 和 PHP_INI_PERDIR 范围类型指令. 清除之前设置的值使用 none 标记. Note: 不要使用 php_value 设定布尔值和php_flag (见下文) .
php_flag name on|off、1|0、true|false、yes|no
用于设置一个布尔配置指令, 只适合于 PHP_INI_ALL 和 PHP_INI_PERDIR 类型指令(和上面的不同就是 php_value 用于设置值(如字符串),而这只能设置 on|off、1|0、true|false、yes|no)
# 下面2个配置不会被ini_set覆盖
php_admin_value name value
功能和php_value一样,但这个不能用在 .htaccess 文件里, 只能在conf(包括virtualhost)文件里引用
php_admin_flag name on|off、1|0、true|false、yes|no
同上
(1)php-fpm.conf(或者其他conf文件)中的配置优先级高于php.ini,即在php服务运行时,php-fpm的配置会覆盖php.ini中的相同的配置。
	 但是: disable_functions 或者 disable_classes 在 php.ini 之中定义的值不会被覆盖掉,但是会将新的设置附加在原有值的后面。
(2)php-fpm.conf(或者其他conf文件)中使用 php_admin_value 或者 php_admin_flag 定义的值,不能被 PHP 代码中的 ini_set() 覆盖。
(3)ini_set() 可以修改php.ini定义好的配置,如运行内存限制值
即在大部分配置上,优先级是:php-fpm.conf > ini_set() > php.ini
如php运行内存限制,假设在php.ini中设置memory_limit = 256M,而在php-fpm配置中设置php_admin_value[memory_limit] = 64M,那么phpinfo()显示的内存限制会是64M,256M的配置是没有生效的。
更新php.ini或者php-fpm.conf后要重启相应服务。
PS:phpinfo()得到的配置信息,就是当前服务的信息。
2023-12-20
发表者 Venus
centos7下升级openssh到openssh-9.5p1版本已关闭评论
官网下载:https://cdn.openbsd.org/pub/OpenBSD/OpenSSH/portable/
[root@localhost ~]# yum install -y wget net-tools
[root@localhost ~]# wget -c https://www.openssl.org/source/openssl-3.1.4.tar.gz --no-check-certificate
[root@localhost ~]# wget -c https://cdn.openbsd.org/pub/OpenBSD/OpenSSH/portable/openssh-9.5p1.tar.gz

# 安装cmd.pm模块,不然编译的时候会引发【Can‘t locate IPC/Cmd.pm in @INC】错误。
[root@localhost ~]# yum install -y perl-CPAN perl-IPC-Cmd gcc gcc-c++

[root@localhost ~]# tar zxvf openssl-3.1.4.tar.gz
[root@localhost ~]# tar zxvf openssh-9.5p1.tar.gz

# 安装openssl 3.1.4版本
[root@localhost ~]# cd openssl-3.1.4
[root@localhost openssl-3.1.4]# ./config --prefix=/usr/local/openssl
[root@localhost openssl-3.1.4]# make
[root@localhost openssl-3.1.4]# make install

[root@localhost openssl-3.1.4]# /usr/local/openssl/bin/openssl version
/usr/local/openssl/bin/openssl: error while loading shared libraries: libssl.so.3: cannot open shared object file: No such file or directory
[root@localhost openssl-3.1.4]# ldd /usr/local/openssl/bin/openssl
	linux-vdso.so.1 =>  (0x00007fff9b5ad000)
	libssl.so.3 => not found
	libcrypto.so.3 => not found
	libdl.so.2 => /lib64/libdl.so.2 (0x00007f0cfe5c4000)
	libpthread.so.0 => /lib64/libpthread.so.0 (0x00007f0cfe3a8000)
	libc.so.6 => /lib64/libc.so.6 (0x00007f0cfdfda000)
	/lib64/ld-linux-x86-64.so.2 (0x00007f0cfe7c8000)

# 可以看到2个库文件未找到
	libssl.so.3 => not found
	libcrypto.so.3 => not found

# 创建软连接,可以find搜索下然后创建软连接
[root@localhost openssl-3.1.4]# ln -s /usr/local/openssl/lib64/libssl.so.3 /usr/lib64/libssl.so.3
[root@localhost openssl-3.1.4]# ln -s /usr/local/openssl/lib64/libcrypto.so.3 /usr/lib64/libcrypto.so.3

[root@localhost openssl-3.1.4]# /usr/local/openssl/bin/openssl version
OpenSSL 3.1.4 24 Oct 2023 (Library: OpenSSL 3.1.4 24 Oct 2023)


# 安装openssh9.5
[root@localhost openssl-3.1.4]# yum install pam-devel libselinux-devel zlib-devel -y
[root@localhost openssl-3.1.4]# rpm -e --nodeps $(rpm -qa | grep openssh)
[root@localhost openssl-3.1.4]# rm -f /etc/ssh/*
[root@localhost openssl-3.1.4]# cd ../openssh-9.5p1
[root@localhost openssh-9.5p1]# ./configure --prefix=/usr --sysconfdir=/etc/ssh --with-md5-passwords --with-pam --with-zlib --with-tcp-wrappers --with-ssl-dir=/usr/local/openssl --without-hardening
[root@localhost openssh-9.5p1]# make && make install
[root@localhost openssh-9.5p1]# cp contrib/redhat/sshd.init /etc/init.d/sshd
[root@localhost openssh-9.5p1]# cp contrib/redhat/sshd.pam /etc/pam.d/sshd

[root@localhost openssh-9.5p1]# echo "PasswordAuthentication yes" >> /etc/ssh/sshd_config
[root@localhost openssh-9.5p1]# echo "PermitRootLogin yes" >> /etc/ssh/sshd_config

# 修改日志到/var/log/secure
[root@localhost openssh-9.5p1]# sed -i 's/#SyslogFacility AUTH/SyslogFacility AUTHPRIV/g' /etc/ssh/sshd_config

# 服务管理
[root@localhost openssh-9.5p1]# cat /usr/lib/systemd/system/sshd.service
[Unit]
Description=OpenSSH server daemon
After=network.target

[Service]
Type=simple
ExecStart=/usr/sbin/sshd -D $OPTIONS
ExecReload=/bin/kill -HUP $MAINPID
KillMode=process
Restart=on-failure
RestartSec=42s

[Install]
WantedBy=multi-user.target

[root@localhost openssh-9.5p1]# systemctl daemon-reload
[root@localhost openssh-9.5p1]# systemctl start sshd
[root@localhost openssh-9.5p1]# systemctl enable sshd


# 升级openssh后调不到/usr/local/bin 下的命令
[root@localhost ~]# vi .bash_profile
PATH=$PATH:$HOME/bin:/usr/local/bin
[root@localhost ~]# source .bash_profile