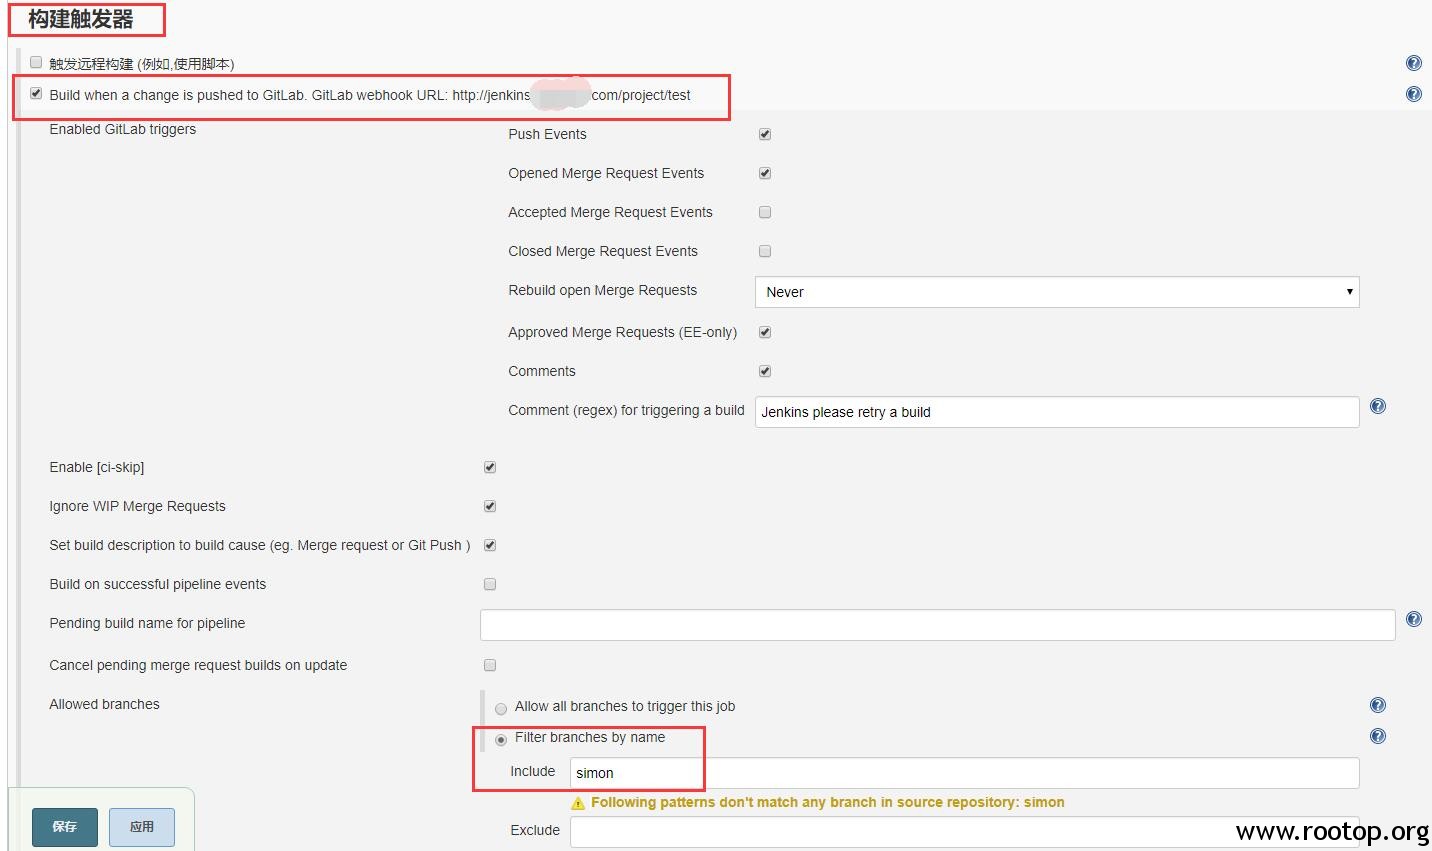
Rootop 服务器运维与web架构

2018-09-25
发表者 Venus
如何取得传入shell脚本的第i个值?要求i循环到几就取第几个参数已关闭评论

如何取得传入shell脚本的第i个值?要求i循环到几就取第几个参数

百度知道的一个问题,需求是:如何取得传入shell脚本的第i个值?要求i循环到几就取第几个参数。
开始想用shell下的$$i获取第几个参数,试了一下发现不行。
有点类似php下的$$var方式获取值。

<?php
$a = 'b';
$b = 2;
$c = $$a;
echo $c;

结果为 2

后来想出用数组方式,通过for循环,然后索引减1的方式获取。shell数组索引也是从0开始。

[root@machine1 ~]# cat a.sh 
#!/bin/bash
total=$#
array=($*)
for ((i=1;i<=$total;i++));
do
    echo "传递参数位:"$i
    echo "对应值:"${array[$i-1]}
done
[root@machine1 ~]# sh a.sh a b c d e
传递参数位:1
对应值:a
传递参数位:2
对应值:b
传递参数位:3
对应值:c
传递参数位:4
对应值:d
传递参数位:5
对应值:e

这样就实现了需求。

2018-09-20
发表者 Venus
jenkins控制台输出中文显示问号已关闭评论

jenkins控制台输出中文显示问号

Started by GitLab push by ???

Commit message: “???”

原因还是因为jenkins运行在docker容器里,容器又不支持中文,需要手动安装中文支持。

参考:https://www.rootop.org/pages/4100.html

2018-09-19
发表者 Venus
docker容器下中文文件夹显示问号,http访问返回404已关闭评论

docker容器下中文文件夹显示问号,http访问返回404

由于保存上传文件的目录是中文,导致在url访问的时候报404
推测是docker容器没有安装中文。容器里ll目录也是问号(容器镜像属于精简了,没有中文包)

查看是否有中文支持:

[root@report ~]# locale -a | grep zh_CN

安装中文包:

[root@report ~]# yum -y install kde-l10n-Chinese
[root@report ~]# yum -y reinstall glibc-common # 可以先不执行试试
[root@report ~]# localedef -c -f UTF-8 -i zh_CN zh_CN.utf8

修改:

[root@report ~]# vi /etc/locale.conf
LC_ALL="zh_CN.utf8"

修改:

[root@report ~]# cat /etc/sysconfig/i18n
LANG="zh_CN.utf8"
LC_ALL="zh_CN.utf8"

# 设置环境变量,添加下面两行

[root@report ~]# cat /etc/profile
export LANG="zh_CN.utf8"
export LC_ALL="zh_CN.utf8"

然后在启动tomcat之前先 source /etc/profile 再启动
这样url中有中文的话访问就正常了。

2018-09-19
发表者 Venus
centos7下挂载阿里云oss服务已关闭评论

centos7下挂载阿里云oss服务

当批量删除文件的时候一个一个选比较费时间,所以想挂载到系统下,通过通配符批量删除。

参考官方文档:https://www.alibabacloud.com/help/zh/doc-detail/32196.htm

里面有rpm的安装包,下载下来。

# 安装 ossfs
yum install -y fuse fuse-libs
rpm -ivh ossfs_1.80.3_centos7.0_x86_64.rpm

# 配置 身份验证
echo aladinn:xxxx:xxx > /etc/passwd-ossfs
chmod 640 /etc/passwd-ossfs

# 在centos下创建挂载点
mkdir /home/oss

# 挂载
ossfs aladinn /home/oss -ourl=oss-cn-qingdao.aliyuncs.com # 外网
ossfs aladinn /home/oss -ourl=oss-cn-qingdao-internal.aliyuncs.com # 内网

# 卸载
fusermount -u /home/oss/

2018-09-17
发表者 Venus
linux下磁盘分区扩容(非lvm)已关闭评论

linux下磁盘分区扩容(非lvm)

参考阿里云云盘扩容方法:https://help.aliyun.com/document_detail/25452.html

root@eth-public-01:~# fdisk /dev/xvdb

Welcome to fdisk (util-linux 2.27.1).
Changes will remain in memory only, until you decide to write them.
Be careful before using the write command.

Command (m for help): m # 帮助命令

Help:

  DOS (MBR)
   a   toggle a bootable flag
   b   edit nested BSD disklabel
   c   toggle the dos compatibility flag

  Generic
   d   delete a partition
   F   list free unpartitioned space
   l   list known partition types
   n   add a new partition
   p   print the partition table
   t   change a partition type
   v   verify the partition table
   i   print information about a partition

  Misc
   m   print this menu
   u   change display/entry units
   x   extra functionality (experts only)

  Script
   I   load disk layout from sfdisk script file
   O   dump disk layout to sfdisk script file

  Save &amp; Exit
   w   write table to disk and exit
   q   quit without saving changes

  Create a new label
   g   create a new empty GPT partition table
   G   create a new empty SGI (IRIX) partition table
   o   create a new empty DOS partition table
   s   create a new empty Sun partition table

Command (m for help): d # 删除原分区 不会丢失数据
Selected partition 1
Partition 1 has been deleted.

Command (m for help): n # 创建分区
Partition type
   p   primary (0 primary, 0 extended, 4 free)
   e   extended (container for logical partitions)
Select (default p): p  # 主分区
Partition number (1-4, default 1):  # 直接回车
First sector (2048-734003199, default 2048):  # 直接回车
Last sector, +sectors or +size{K,M,G,T,P} (2048-734003199, default 734003199):  # 直接回车

Created a new partition 1 of type 'Linux' and of size 350 GiB.

Command (m for help): wq # 保存退出
The partition table has been altered.
Calling ioctl() to re-read partition table.
Syncing disks.

# ubuntu好像会自动挂载,再手动卸载它。
root@eth-public-01:~# umount /dev/xvdb1
root@eth-public-01:~# df -h
Filesystem      Size  Used Avail Use% Mounted on
udev            7.9G     0  7.9G   0% /dev
tmpfs           1.6G  8.7M  1.6G   1% /run
/dev/xvda1       18G  7.4G  9.2G  45% /
tmpfs           7.9G     0  7.9G   0% /dev/shm
tmpfs           5.0M     0  5.0M   0% /run/lock
tmpfs           7.9G     0  7.9G   0% /sys/fs/cgroup
tmpfs           1.6G     0  1.6G   0% /run/user/0

# 检查文件系统
root@eth-public-01:~# e2fsck -f /dev/xvdb1
e2fsck 1.42.13 (17-May-2015)
Pass 1: Checking inodes, blocks, and sizes
resizPass 2: Checking directory structure
Pass 3: Checking directory connectivity
Pass 4: Checking reference counts
Pass 5: Checking group summary information  
/dev/xvdb1: 110213/13107200 files (69.6% non-contiguous), 52423642/52428544 blocks
                                                                                                                                             
# 变更文件系统大小
root@eth-public-01:~# resize2fs /dev/xvdb1
resize2fs 1.42.13 (17-May-2015)
Resizing the filesystem on /dev/xvdb1 to 91750144 (4k) blocks.
The filesystem on /dev/xvdb1 is now 91750144 (4k) blocks long.

# 重新挂载即可
root@eth-public-01:~# mount -a # 我这里已经写到/etc/fstab了
root@eth-public-01:~# df -h
Filesystem      Size  Used Avail Use% Mounted on
udev            7.9G     0  7.9G   0% /dev
tmpfs           1.6G  8.7M  1.6G   1% /run
/dev/xvda1       18G  7.4G  9.2G  45% /
tmpfs           7.9G     0  7.9G   0% /dev/shm
tmpfs           5.0M     0  5.0M   0% /run/lock
tmpfs           7.9G     0  7.9G   0% /sys/fs/cgroup
tmpfs           1.6G     0  1.6G   0% /run/user/0
/dev/xvdb1      345G  197G  131G  61% /home

这样就实现数据不丢失且实现分区扩容。