docker容器是debian的镜像,没有ps命令,查个进程没法查。
安装procps包
apt-get install procps

2018-09-17
发表者 Venus
ubuntu安装ps命令已关闭评论
docker容器是debian的镜像,没有ps命令,查个进程没法查。
安装procps包
apt-get install procps
2018-09-12
发表者 Venus
钉钉保存文件到桌面提示 xxx找不到文件。请检查文件名是否正确,然后重试。已关闭评论
钉钉接收发送的文件到桌面上,然后居然报错了。提示找不到文件。请检查文件名是否正确,然后重试。
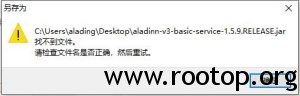
但是保存到别的分区没有问题,应该跟钉钉没有关系(刚更新钉钉)。
怀疑是系统自带的defender问题。
找啊找,找到了。依次点击:
开始菜单 – 设置 – 更新和安全 – windows安全 – 病毒和威胁防护 – 勒索软件防护 – 受控制文件夹的访问
改为关闭就可以了。

问题解决。
2018-08-24
发表者 Venus
redis修改dump文件目录已关闭评论
问题:
redis启动时,默认的dump文件(dump.rdb)是保存在redis服务启动时当前所在的路径下。
这样安装多个redis后,如果在同一个路径下启动服务,会导致dump文件数据错误。
这样就需要分开保存dump文件。
修改redis配置文件
# dump 数据文件名
dbfilename dump.rdb
# dump文件保存路径
dir /usr/local/redis
这样再启动redis后,dump文件会存在dir定义的目录中。
2018-08-23
发表者 Venus
linux下通过inode索引删除文件名包含乱码的文件或文件夹已关闭评论
不知道怎么生成的乱码文件夹,用rm删不掉,用xftp也删不掉。最后找到一个解决方法用inode索引
1、首先查看文件夹的inode值
[root@node6 home]# ll -i
total 1483836
21889025 drwxr-xr-x 2 root root 4096 Aug 2 16:08 ?½??ļ???
 8126465 drwxr-xr-x 5 root root 4096 Apr 27 09:20 data
 11 drwx------ 2 root root 16384 Mar 14 14:21 lost+found
23592961 drwxr-xr-x 5 root root 4096 Jul 7 12:24 sailei_api_jar
22806529 drwxr-xr-x 4 root root 4096 May 29 16:51 software
23199745 drwxr-xr-x 8 root root 4096 Jan 10 2018 upload
 12 -rw-r--r-- 1 root root 1519406123 May 29 17:22 upload.tar.gz
2、确认此inode值是乱码的文件夹
[root@node6 home]# find -inum 21889025
./?½??ļ???
3、删除
[root@node6 home]# find -inum 21889025 -delete
[root@node6 home]# ll
total 1483832
drwxr-xr-x 5 root root 4096 Apr 27 09:20 data
drwx------ 2 root root 16384 Mar 14 14:21 lost+found
drwxr-xr-x 5 root root 4096 Jul 7 12:24 sailei_api_jar
drwxr-xr-x 4 root root 4096 May 29 16:51 software
drwxr-xr-x 8 root root 4096 Jan 10 2018 upload
-rw-r--r-- 1 root root 1519406123 May 29 17:22 upload.tar.gz
上面是空文件夹/文件删除,不能删非空目录。
如果是非空文件夹,则用下面方法删除:
[root@node6 home]# find -inum 126943234 -exec rm -rf {} \;
会提示 No such file or directory 但实际已删除
2018-07-26
发表者 Venus
414 Request-URI Too Large已关闭评论
浏览器报错:414 Request-URI Too Large
在nginx中追加2句:
client_header_buffer_size 512k;
large_client_header_buffers 4 512k;
查看tomcat日志中也报错:
java.lang.IllegalArgumentException: Request header is too large

在tomcat配置Connector段中追加一个参数 maxHttpHeaderSize
<Connector xxx maxHttpHeaderSize =”512000″/>
以字节为单位,默认是4096字节也就是4k,这里改为跟nginx一致,512k。
重启tomcat、nginx,但是 没! 生! 效!
根本原因在于,浏览器中操作时要批量删除一些数据,这些数据的id传递到后台是通过get方式传输,但是get传输是有长度限制,具体多长没查。
让开发改为post请求即可。