采用这个架构主要考虑到apache跑php应用相对nginx来言比较稳定,前端用nginx做反向代理,并实现缓存功能。
软件版本:
apr-1.5.1.tar.gz
apr-util-1.5.4.tar.gz
cmake-3.0.2.tar.gz
httpd-2.4.10.tar.gz
libiconv-1.14.tar.gz
mariadb-10.0.14.tar.gz
nginx-1.6.2.tar.gz
ngx_cache_purge-2.1.tar.gz
pcre-8.36.tar.gz
php-5.6.1.tar.gz
源码全部打包到博客中,下载地址:https://www.rootop.org/rs/lanmp.tar.gz
安装依赖rpm包:
[root@nginx-cache tar_gz]# yum -y install gcc gcc-c++ make automake autoconf kernel-devel ncurses-devel libxml2-devel openssl-devel curl-devel libjpeg-devel libpng-devel pcre-devel libtool-libs freetype-devel gd zlib-devel file bison patch mlocate flex diffutils readline-devel glibc-devel glib2-devel bzip2-devel gettext-devel libcap-devel libmcrypt-devel
解压所有的源码包,过程略。
安装apache2.4:
[root@nginx-cache httpd-2.4.10]# useradd -s /sbin/nologin apache #创建apache运行账户
以前2.2版本的apache需要先安装apr和apr-util,在2.4版本中只需要将apr和apr-util复制到apache源码包中的srclib目录下即可。
解压apr-1.5.1.tar.gz和apr-util-1.5.4.tar.gz,并改名为apr和apr-util,复制到apache源码包中的srclib目录下。
[root@nginx-cache httpd-2.4.10]# ./configure --prefix=/usr/local/apache --with-included-apr --enable-so --enable-deflate=shared --enable-expires=shared  --enable-headers=shared --enable-rewrite=shared --enable-static-support
[root@nginx-cache httpd-2.4.10]# make && make install

[root@nginx-cache httpd-2.4.10]# cp build/rpm/httpd.init /etc/init.d/httpd #复制启动脚本
[root@nginx-cache httpd-2.4.10]# chmod 755 /etc/init.d/httpd  #添加执行权限
[root@nginx-cache httpd-2.4.10]# ln -s /usr/local/apache/ /etc/httpd  #创建软连接适用启动脚本
[root@nginx-cache httpd-2.4.10]# ln -s /usr/local/apache/bin/httpd /usr/sbin/httpd
[root@nginx-cache httpd-2.4.10]# ln -s /usr/local/apache/bin/apachectl /usr/sbin/apachectl
[root@nginx-cache httpd-2.4.10]# ln -s /usr/local/apache/logs/ /var/log/httpd
修改主配置文件,运行账户和组改为apache:
[root@nginx-cache httpd-2.4.10]# vi /etc/httpd/conf/httpd.conf
User apache
Group apache
[root@nginx-cache httpd-2.4.10]# service httpd start
[root@nginx-cache httpd-2.4.10]# chkconfig httpd on
[root@nginx-cache httpd-2.4.10]# lsof -i:80
COMMAND PID USER FD TYPE DEVICE SIZE/OFF NODE NAME
httpd 16001 root 4u IPv6 184948 0t0 TCP *:http (LISTEN)
httpd 16003 apache 4u IPv6 184948 0t0 TCP *:http (LISTEN)
httpd 16004 apache 4u IPv6 184948 0t0 TCP *:http (LISTEN)
httpd 16005 apache 4u IPv6 184948 0t0 TCP *:http (LISTEN)
这里发现用service httpd stop会失败,暂未查原因,可以使用apachectl start/stop来管理服务状态。
安装mariadb:
安装mariadb之前需要先装cmake工具。用来生产mariadb编译信息。
[root@nginx-cache cmake-3.0.2]# ./configure && gmake && make install
[root@nginx-cache mariadb-10.0.14]# useradd -s /sbin/nologin mysql #添加mysql运行账户
[root@nginx-cache mariadb-10.0.14]# cmake -DCMAKE_INSTALL_PREFIX=/usr/local/mariadb -DMYSQL_UNIX_ADDR=/tmp/mariadb.sock -DDEFAULT_CHARSET=utf8 -DDEFAULT_COLLATION=utf8_general_ci -DWITH_EXTRA_CHARSETS=all -DWITH_INNOBASE_STORAGE_ENGINE=1 -DWITH_MYISAM_STORAGE_ENGINE=1 -DWITH_READLINE=1 -DENABLED_LOCAL_INFILE=1 -DMYSQL_DATADIR=/usr/local/mariadb/data

[root@nginx-cache mariadb-10.0.14]# make  #这一步过程比较慢
[root@nginx-cache mariadb-10.0.14]# make install

初始化mysql:
[root@nginx-cache mariadb-10.0.14]# /usr/local/mariadb/scripts/mysql_install_db --basedir=/usr/local/mariadb/ --datadir=/usr/local/mariadb/data/ --user=mysql
修改my.cnf配置文件:
[mysqld]
datadir=/usr/local/mariadb/data/  #修改本行为 /usr/local/mariadb/data/
socket=/tmp/mariadb.sock #sock文件路径,跟编译参数一样
pid-file=/tmp/mariadb.pid #添加pid文件路径
user=mysql
# Disabling symbolic-links is recommended to prevent assorted security risks
symbolic-links=0

[mysqld_safe]
log-error=/var/log/mysqld.log
pid-file=/tmp/mariadb.pid #pid文件路径
[root@nginx-cache mariadb-10.0.14]# service mysqld start
Starting MySQL SUCCESS!
[root@nginx-cache mariadb-10.0.14]# lsof -i:3306
COMMAND PID USER FD TYPE DEVICE SIZE/OFF NODE NAME
mysqld 10337 mysql 16u IPv6 273675 0t0 TCP *:mysql (LISTEN)
[root@nginx-cache mariadb-10.0.14]# chkconfig mysqld on
设置mariadb的root密码,此处密码也设置为root :
[root@nginx-cache mariadb-10.0.14]# /usr/local/mariadb/bin/mysql
MariaDB [(none)]> use mysql;
Reading table information for completion of table and column names
You can turn off this feature to get a quicker startup with -A

Database changed
MariaDB [mysql]> update user set password=password('root') where user='root';
Query OK, 4 rows affected (0.01 sec)
Rows matched: 4  Changed: 4  Warnings: 0

MariaDB [mysql]> flush privileges;
Query OK, 0 rows affected (0.00 sec)

MariaDB [mysql]> exit
安装php:
[root@nginx-cache php-5.6.1]# ./configure --prefix=/usr/local/php --with-apxs2=/usr/local/apache/bin/apxs --with-config-file-path=/etc --with-config-file-scan-dir=/etc/php.d --with-openssl --with-zlib --enable-bcmath --with-bz2 --with-curl --enable-ftp --with-gd --enable-gd-native-ttf --with-gettext --with-mhash --enable-mbstring --with-mcrypt --enable-soap --enable-zip --with-iconv=/usr --with-mysql=/usr/local/mysql --without-pear --disable-fileinfo
这里遇到一个错误:
configure: error: Don’t know how to define struct flock on this system, set –enable-opcache=no
解决方法:
[root@nginx-cache php-5.6.1]# vi /etc/ld.so.conf.d/local.conf 添加:
/usr/local/lib
[root@nginx-cache php-5.6.1]# ldconfig #生效
重新configure。
[root@nginx-cache php-5.6.1]# make
[root@nginx-cache php-5.6.1]# make install

[root@nginx-cache php-5.6.1]# cp php.ini-production /etc/php.ini
添加apache对php文件解析映射:
[root@nginx-cache php-5.6.1]# vi /etc/httpd/conf/httpd.conf
Addtype application/x-httpd-php .php
重启apache。
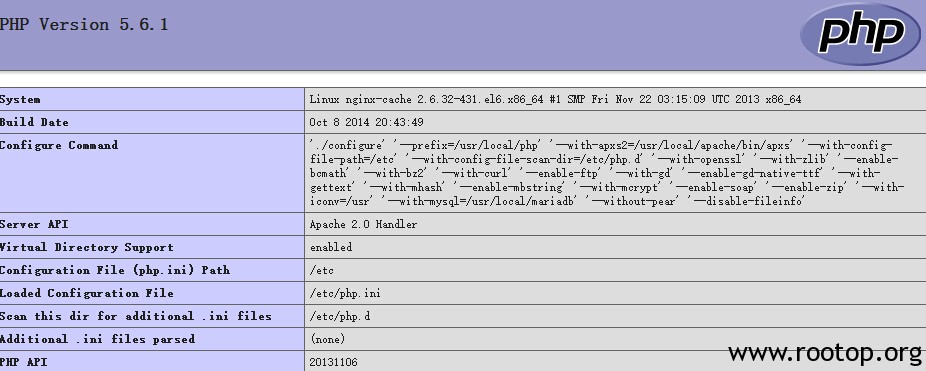
添加phpinfo测试页,测试php是否正常打开:
[root@nginx-cache ~]# vi /etc/httpd/htdocs/p.php

<?php
phpinfo ();
?>
通过浏览器访问:http://42.62.73.xxx/p.php
看是否出现phpinfo信息,如果没有回头检查。至此lamp完成了。
配置nginx:
现在要让nginx反向代理apache,并实现nginx本地缓存。
先安装pcre:
[root@nginx-cache pcre-8.36]# ./configure && make && make install
安装nginx,在这里添加第三方模块ngx_cache_purge,因为nginx用作本地缓存,加上这个模块方便清除缓存。从https://github.com/FRiCKLE/ngx_cache_purge/releases下载。
[root@nginx-cache pcre-8.36]# useradd -s /sbin/nologin www
[root@nginx-cache nginx-1.6.2]# ./configure --user=www --group=www --prefix=/usr/local/nginx --with-http_stub_status_module --with-http_ssl_module --with-http_gzip_static_module --add-module=../ngx_cache_purge-2.1
[root@nginx-cache nginx-1.6.2]# make && make install
添加nginx启动脚本:
[root@nginx-cache ~]# vi /etc/init.d/nginx
#! /bin/bash
PATH=/usr/local/sbin:/usr/local/bin:/sbin:/bin:/usr/sbin:/usr/bin
DESC="nginx daemon"
NAME=nginx
DAEMON=/usr/local/nginx/sbin/$NAME
CONFIGFILE=/usr/local/nginx/conf/$NAME.conf
PIDFILE=/usr/local/nginx/logs/$NAME.pid
SCRIPTNAME=/etc/init.d/$NAME

set -e
[ -x "$DAEMON" ] || exit 0

do_start() {
 $DAEMON -c $CONFIGFILE || echo -n "nginx already running"
}

do_stop() {
 kill -INT `cat $PIDFILE` || echo -n "nginx not running"
}

do_reload() {
 kill -HUP `cat $PIDFILE` || echo -n "nginx can't reload"
}

case "$1" in
 start)
 echo -n "Starting $DESC: $NAME"
 do_start
 echo "."
 ;;
 stop)
 echo -n "Stopping $DESC: $NAME"
 do_stop
 echo "."
 ;;
 reload|graceful)
 echo -n "Reloading $DESC configuration..."
 do_reload
 echo "."
 ;;
 restart)
 echo -n "Restarting $DESC: $NAME"
 do_stop
 do_start
 echo "."
 ;;
 *)
 echo "Usage: $SCRIPTNAME {start|stop|reload|restart}" >&2
 exit 3
 ;;
esac

exit 0
[root@nginx-cache ~]# chmod 755 /etc/init.d/nginx
现在把apache的监听端口改为8080,让nginx使用80端口。
[root@nginx-cache ~]# vi /etc/httpd/conf/httpd.conf
Listen 8080
重启apache。
配置反向代理:
[root@nginx-cache conf]# grep -v "#" nginx.conf | grep -v "^$"

user  www www;
worker_processes  10;
worker_rlimit_nofile 51200;

events
        {
                use epoll;
                worker_connections 51200;
        }

http {
    include       mime.types;
    default_type  application/octet-stream;
    sendfile        on;
    keepalive_timeout  65;

	upstream apache {
		server 127.0.0.1:8080 max_fails=3 fail_timeout=20s;
	}

	proxy_temp_path /home/temp_dir;
	proxy_cache_path /home/cache levels=1:2 keys_zone=cache_one:200m inactive=1d max_size=5g;

	include vhost/*.conf;
}
主要定义下面两行,设置缓存临时目录和缓存路径,需要在同一个分区下。
缓存区为cache_one占用内存200M,缓存1天,占用硬盘5G。
proxy_temp_path /home/temp_dir;
proxy_cache_path /home/cache levels=1:2 keys_zone=cache_one:200m inactive=1d max_size=5g;
虚拟主机配置:
[root@nginx-cache conf]# grep -v "#" vhost/blog.conf | grep -v "^$"
server {
 listen 80;
 server_name www.qdsop.com;
 index index.php index.html;
 error_log  /var/log/nginx_error.log  crit;

if ($request_method = "PURGE")
{
rewrite ^(.*)$ /purge$1 last;
}

location ~ /purge(/.*)
{
allow  all;
proxy_cache_purge  cache_one $host$1$is_args$args;
        }

location / {
 proxy_pass http://apache;
 proxy_next_upstream http_500 http_502 http_503 error timeout invalid_header;
 proxy_redirect off;
 proxy_set_header Host $host;
 proxy_set_header X-Real-IP $remote_addr;
 proxy_set_header X-Forwarded-For $proxy_add_x_forwarded_for;
 client_body_buffer_size 128k;
 proxy_connect_timeout 90;
 proxy_send_timeout 90;
 proxy_read_timeout 90;
 proxy_buffer_size 4k;
 proxy_buffers 4 32k;
 proxy_busy_buffers_size 64k;
 proxy_temp_file_write_size 64k;
 	}

location ~ .*\.(gif|jpg|png|htm|html|css|js|flv|ico|swf)(.*) {
 proxy_pass http://apache;
 proxy_cache cache_one;
 proxy_cache_valid 200 302 1h;
 proxy_cache_valid 301 1d;
 proxy_cache_valid any 1m;
 proxy_cache_key $host$uri$is_args$args;
 add_header Cache "$upstream_cache_status";
 error_log /var/log/image_error.log debug;
 	}

location /status {
 stub_status on;
 access_log  off;
                  }
}
虚拟主机配置文件主要注意下面红色部分一定要在缓存配置内容之上,否则可能会出现清空缓存时404错误。
if ($request_method = “PURGE”)
{
rewrite ^(.*)$ /purge$1 last;
}
location ~ /purge(/.*)
{
allow all;
proxy_cache_purge cache_one $host$1$is_args$args;
}
现在可以通过访问nginx实现反向代理apache。
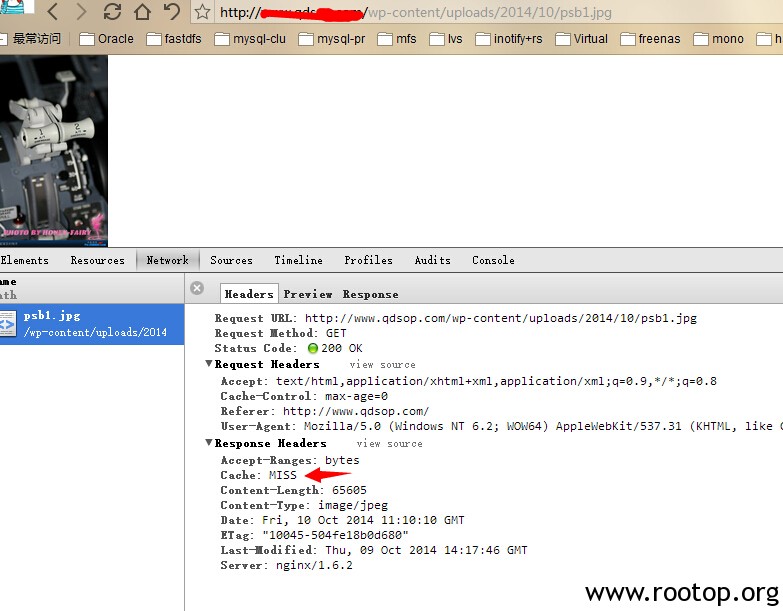
查看命中状态,现在访问一个特定的静态页面。比如图片:
第一次访问图片的时候,可以看到状态为:“未命中”

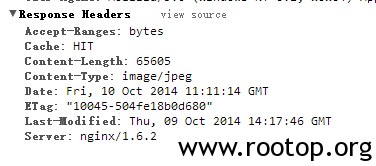
刷新浏览器查看响应头。
现在测试清空缓存:
添加了ngx_cache_purge以后可以在原有的url上加上purge,实现清空缓存,比如:
http://www.xxx.com/purge/wp-content/uploads/2014/10/psb1.jpg
 这样nginx反向代理apache配置完成,拓展一下,在本文基础上可以实现多台web进行负载均衡,nginx独立为一台服务器,通过本地缓存可以降低后端服务器压力,静态页面都由nginx处理,这样可以提高整体的并发。在这里测试的时候,装了一个WordPress环境进行测试,并配置了WordPress的伪静态功能,效果还可以,将服务器配置提高为16vcpu+32G内存,30M带宽。通过webbench压力测并发1W持续2分钟,通过nginx的status监测在3000左右,出口流量最高达到5M,不确定云计算平台网络流量监控是否准确,至此,过程全部结束!
提供一个通过web方式清空缓存的php程序,直接访问即可。然后输入要清空的缓存url路径。下载地址:https://www.rootop.org/rs/ngx_cache_purge.tar.gz
PS:
在安装php时,到make的时候遇到一个错误:
cc: Internal error: Killed (program cc1)
Please submit a full bug report.
See <http://bugzilla.redhat.com/bugzilla> for instructions.
make: *** [ext/fileinfo/libmagic/apprentice.lo] Error 1
这个原因是内存不足(512内存),我用的是云服务器,没有交换分区。导致出错,可以通过加参数 –disable-fileinfo 解决。
配置nginx出现的一个错误:Starting nginx: nginx: [emerg] the size 209715200 of shared memory zone “cache_one” conflicts with already declared size 0 in /etc/nginx/nginx.conf:50
注意配置段中的区域包含关系. proxycachepatch 要在proxy_cache前已经定义.
what seems to be the problem?
[emerg]: the size 52428800 of shared memory zone “media” conflicts with already declared size 0 in /etc/nginx/conf.d/cache.conf:5 configuration file /etc/nginx/nginx.conf test failed
This may be caused if “proxycache media” is included before proxycache_path.
原创文章,转载请注明。本文链接地址: https://www.rootop.org/pages/2954.html


