穿透路由器访问内网共享文件及打印机

     环境:

    技术中心有一台彩色打印机,销售部不时的会用其打印合同,但不允许直接登录打印服务器操作,因为其中放置了SQL数据库及代码管理。之前在销售部与技术中心之间加了一台路由,保护开发的安全。所以问题来了,怎么才能让销售那边访问打印机。

    解决:

    文件共享、打印机共享、网上邻居都采用了一套协议,确切称之为接口,就是NETBIOS,关于netbios的资料在这里不描述,可以google之。

netbios使用的几个相关端口 TCP 137/139   UDP 137/138    TCP 445

可以在路由上做映射,将这几个端口全部映射到内网的打印机服务器上,然后通过访问路由上的”Wan”接口即可。

这里采用UNC方式访问共享:

开始-运行-键入”\\192.168.1.234″ 回车即可访问。

配置Server2008R2远程桌面登录时显示上一次登陆信息

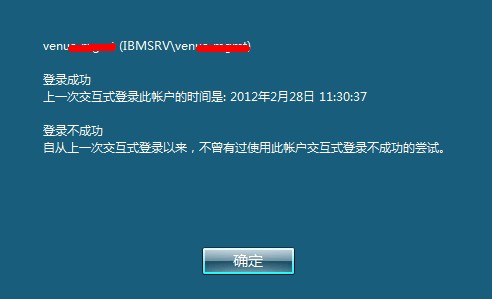
登陆成功
上一次交互式登陆此账户的时间是:2012年2月28日 11:30:37

登陆不成功
自从上一次交互式登陆以来,不曾有过使用此账户交互式登陆不成功的尝试。

这是在远程登陆服务器时,进入系统之前提示的信息,表明了上一次用户登陆相关信息,默认是不显示。

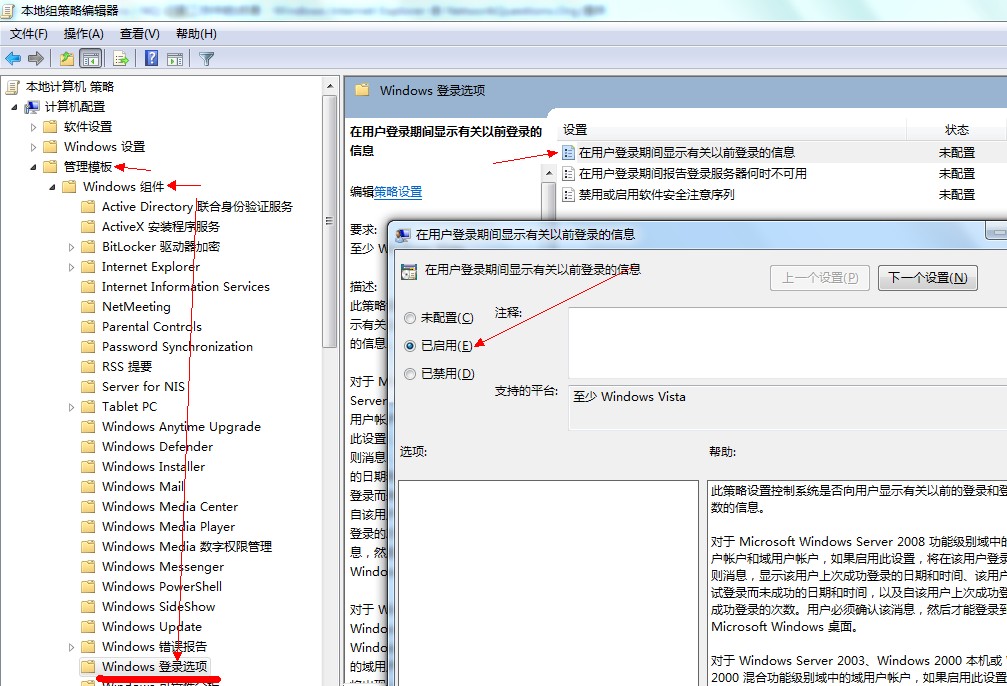
打开组策略:计算机配置-管理模板-windows组件-windows登陆选项-在用户登陆期间显示有关以前登陆的信息,设置为启用即可。

刷新组策略:gpupdate /force 。

configure: error: the –with-apr parameter is incorrect

checking for working mkdir -p… yes
/root/httpd-2.2.22/httpd-2.2.22/srclib/apr-util/configure: line 2806: /root/httpd-2.2.22/httpd-2.2.22/srclib/apr-util/build/get-version.sh: Permission denied
/root/httpd-2.2.22/httpd-2.2.22/srclib/apr-util/configure: line 2807: /root/httpd-2.2.22/httpd-2.2.22/srclib/apr-util/build/get-version.sh: Permission denied
/root/httpd-2.2.22/httpd-2.2.22/srclib/apr-util/configure: line 2809: /root/httpd-2.2.22/httpd-2.2.22/srclib/apr-util/build/get-version.sh: Permission denied
APR-util Version:
checking for chosen layout… apr-util
checking for gcc… gcc
checking for C compiler default output file name… a.out
checking whether the C compiler works… yes
checking whether we are cross compiling… no
checking for suffix of executables…
checking for suffix of object files… o
checking whether we are using the GNU C compiler… yes
checking whether gcc accepts -g… yes
checking for gcc option to accept ISO C89… none needed
Applying apr-util hints file rules for i686-pc-linux-gnu
checking for APR… configure: error: the –with-apr parameter is incorrect. It must specify an install prefix, a build directory, or an apr-config file.
configure failed for srclib/apr-util
[root@localhost httpd-2.2.22]#

我这里报错的原因是没有权限,最后直接给整个安装包加-R并设为777权限,重新./configure没问题了。

linux ntp时间同步的两种方法

服务端IP 192.168.1.101      客户端IP 192.168.1.88

1、首先配置ntpd服务器:

vi /etc/ntp.conf

 配置文件中有restrict default语句

 #restrict default nomodify notrap noquery     #  默认允许所有可连接客户端ntpdate到本机   

restrict default ignore          #  默认所有客户端禁止ntpdate到本机

 #与上级服务端连续性同步时间,prefer表示优先,如无可不设置

#server 上级ntp服务器IP或者域名 [prefer] 

server 210.72.145.44 perfer

 #当之前设置了restrict default ignore的情况下,可以设置哪些客户可以ntpdate到本机

restrict 192.168.1.88 mask 255.255.255.255 nomodify notrap

#其余为可选设置,以默认值即可

开启ntpd服务

service ntpd start && chkconfig –level 345 ntpd on 

2、客户端配置:

此时有2种办法使客户端与服务器同步,一种是用ntpdate + crontab,另一种是客户端也开启ntpd服务

 ntpdate + crontab

#使用ntpdate同步一次时间,查看是否有正确回显

ntpdate 192.168.1.101

 #如为以下报错,一般是因为服务端才开启,需要等5分钟左右就好了

[root@test ~]# ntpdate 192.168.1.101
 5 Nov 05:25:51 ntpdate[3892]: no server suitable for synchronization found

#如显示以下信息表示成功

[root@test ~]# ntpdate 192.168.1.101
 7 Nov 22:34:59 ntpdate[4546]: step time server 192.168.1.101 offset 2.946644 sec

#这样就可以将ntpdate命令放入crontab中,定期执行

crontab -e

添加一条,如

* 2 * * * * ntpdate 192.168.1.101    #每天2点执行

保存即可

如有开启iptables,配置允许ntpd服务的udp协议端口123被访问。 

第二种同步方法

#使用ntpdate同步一次时间,查看是否有正确回显

ntpdate 192.168.1.101

#设置ntpd服务

vi /etc/ntp.conf

方法同上,但注意将设置的上级ntp server 设置为服务器的地址。

server 192.168.1.101 prefer

#设置开启服务后自动同步上级ntp server时间

vi /etc/ntp/step-tickers   加入一条

192.168.1.101

重启ntpd服务。

[root@test ~]# service ntpd restart
关闭 ntpd:                                                [确定]
ntpd: 同步时间服务器:                                     [确定]
同步硬件时钟到系统时钟                                     [确定]
启动 ntpd:                                                [确定]
You have new mail in /var/spool/mail/root
[root@localhost ~]#